
Three Wire Spiral Projects
For these projects, 14 gauge wire is recommended, but 16 gauge can be
used. Copper, brass, and sterling silver cmust be annealed (heated with a torch) before working.
Copper is recommended because it is easier to work than the
others, is less expensive, and is readily available in hardware stores or as
recycled electrical wire.
Black mild steel is another good choice. It has already
been annealed. It is stiffer
and a bit harder to work than copper, but it holds its shape better than the other metals and is inexpensive.
It is sold in hardware stores as "baling wire" or "tie wire", usually in coils
about six inches in diameter that are wrapped in oiled paper.
Only new steel wire should be used. Recycled steel wire has been unevenly
work-hardened and is often damaged or rusty.
TOOLS: Round nose and chain nose pliers, wire cutters, file, ruler.
For
nonferrous metals: torch for annealing copper, brass, and silver wire.
Dremel, Foredom, or bench grinder with felt or fabric buff and jeweler's rouge.
For black steel wire: Dremel or
Foredom tool with wire brush.
A NOTE ON BUYING PLIERS: Pliers must be purchased from a supplier that
specializes in jewelry and/or metalworking tools.
Many brands and sizes are available. Price is usually (but not always) an
indicator of quality. For the projects described here,
the delicate pliers that are used for gold and silver wirewrapping or for
intricate copper beaded wire jewelry (usually with 18 or 20 gauge wire)
will probably be too small. A slightly larger and sturdier size will be
needed, especially for black steel wire, which is harder than copper
and causes more wear on the pliers. In general, AVOID pliers that cost
less than $10, those that are sold only in sets,
and those recommended by a company or workshop instructor who promotes a
particular brand of tools.
Pliers can cost as much as $50 but you can get good ones for $15-$30 each.
Kent's Tools has a huge selection of jewelry tools. They
sell by mail order but also have a store in Tucson, AZ and a booth at the annual
Tucson Gem and Mineral shows in February.
http://www.kentstools.com/
ANNEALING NONFERROUS WIRE: Use the torch with a large, brushy flame to
heat the wire until it turns black.
Keep the flame moving so you don't overheat parts of the wire. If the
metal begins to glow red, remove the flame! Let the annealed wire cool.
To remove the black firescale (copper oxides), put the wire in a glass bowl of
vinegar for several hours. Set it outdoors to minimize fumes.
When the color is restored, rinse the wire in cold water and let it dry.
It won't be shiny but you'll fix that later.
(This step, called pickling, is often done hot but is safer and just as
effective when done cold. Jewelers traditionally use sulfuric acid which
is expensive, toxic, and unnecessary.)
A NOTE ON TECHNIQUE: These three projects are not intended to offer a
complete introduction to wireworking.
Some experience is helpful but not essential, and the wire clasps are an
excellent beginner's project.
Good wirework is tightly coiled, neatly made, and consistent. These
characteristics form much of the of the aesthetic appeal of wirework. They
also demonstrate skill and good crafstmanship.
Wire ends should be filed smooth, any nicks or rough spots should be sanded, and
the finished item should be polished appropriately.
Earrings present a special challenge, since the designs should be mirror images
(spirals coil in the opposite direction).
If the earrings are intended to be odd, it should be obvious (different lengths,
degrees of complexity, etc.)
I don't use or recommend jigs (pegs, nails in a board, or other
wirewrapping templates) for forming wire. They invariably result in wire
objects that are too open, unstable, and unevenly coiled.
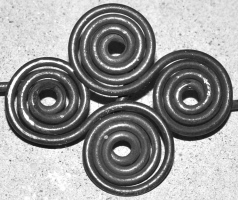
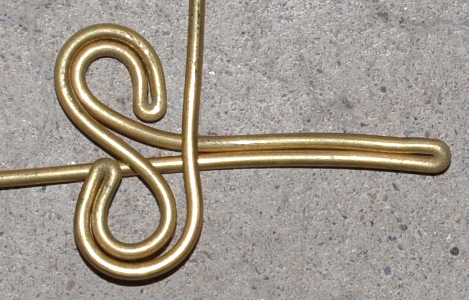
1. Double Spiral
Known from European bronze "spectacle fibula" artifacts
from about 1000 B.C., this versatile motif can be used for most types of
jewelry.
14 or 16 gauge wire can be used, but the larger size is recommended since the
design is most stable and effective in 14 gauge.
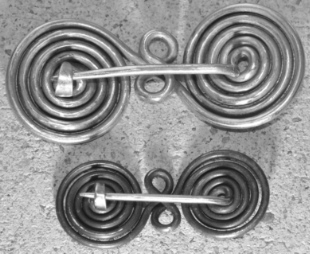
The photo above shows a five-coil fibula in 14 gauge copper, and above it a belt
buckle in heavy 12 gauge copper,
which is the largest size that can be worked cold with the tools and techniques
shown here.
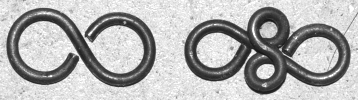
This double spiral is a more elaborate version of the basic figure-eight
chain link:
MAKE A SPECTACLE FIBULA:
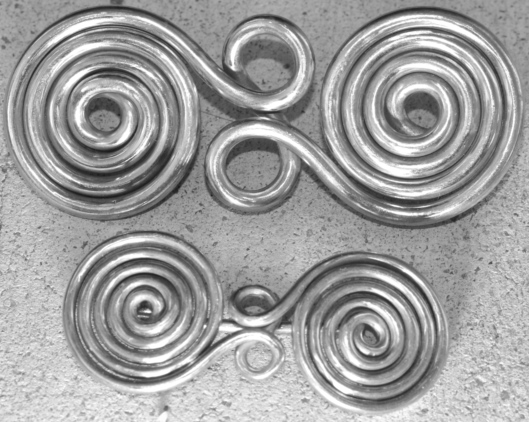
Below are finished brooches in 14 gauge copper and 16 gauge black steel.
Note the difference in size even though both have five coils.
Photographed upside down to show the pin and clasp.
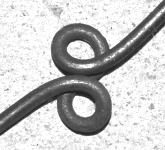
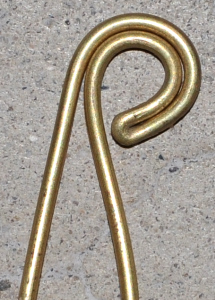
1. Cut a piece of 14 gauge wire about 40 cm long. Use round nose pliers
to make two opposite loops at the center of the wire.
The "tails" should curl in opposite directions but both should lie on the top of
the center of the wire, like this:
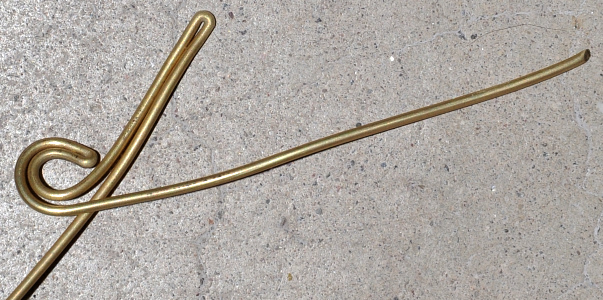
2. Measure 15 cm from each loop and bend the wire down at a sharp right
angle, perpendicular
to the loops. These "tails" will form the brooch clasp.
3. Use the round nose pliers to start the spiral. Make a tight loop
just above the bend that forms the tail, and form the coil in an S-curve back
toward the central loop.
4. Use the round nose or chain nose pliers to finish a tight coil that
meets the central loops.
5. Repeat with the other half of the wire. Now the spirals are done
and two long wire tails hang from the underside.
6. Clip one of the tails to about 1 cm and file the end smooth. It
can be hammered slightly flat if you wish. Curl it into a "C" to form the
clasp.
7. To form the pin, bend the other tail down so it is close to the brooch
and fits the clasp. Clip it about .5 cm past the clasp, so it doesn't
show from the top.
8. Unhook the pin from the clasp and file the end to form a point.
Fasten the pin.
9. Polish the finished fibula. Use jeweler's rouge on a felt or
fabric buff for nonferrous metals, and a tiny wire disc brush for black steel
wire.
VARIATONS:
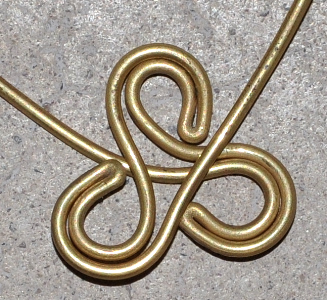
1. CENTER LOOPS: The two small center
loops can be wrapped one, two, or three times. Any more and the design
evolves into something different,
like this example with the center loops wrapped four times and finished with
four-coil spirals:
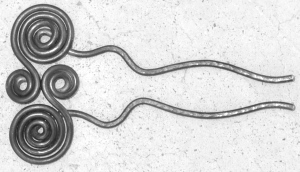
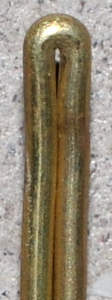
2. WIRE TAILS:
The wire "tails" can easily be finished for chain links and other
jewelry. Many are easier to make than the brooch.
This hairpin is one of the simplest examples. The wires
are shaped, flattened slightly to stiffen them, and the points filed smooth and
round:
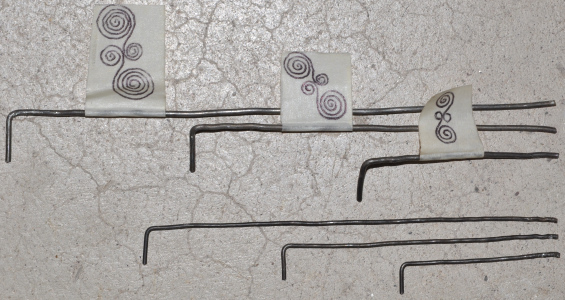
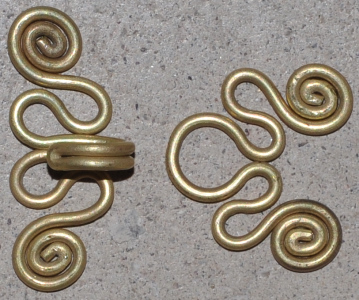
3. SPIRAL SIZE
The spirals can be made in several sizes depending on the number of coils.
The design is most stable and durable with three to five coils.
Six or seven coils can be used but the design is less stable (more likely to
bend or unravel with use).
I made a set of reference wires for easy measuring. Sizes and a photo are given below.
These are guidelines only.
For best results with your own projects, make your own set: Coil a scrap
piece of wire the desired number of times, then uncoil and label it.
These are especially useful for production work or expensive materials such as
silver wire.
Note that the number of wraps on the center spiral makes no difference since
they are formed before the larger spirals are measured.
14 gauge wire
5 coils: 15 cm
4 coils: 10 cm
3 coils: 5.5 cm
16 gauge wire
5 coils: 11.3 cm
4 coils: 7.5 cm
3 coils: 4.3 cm
Below is a set of mirror-image chains made from 14 gauge black steel wire links
in three graduated sizes.
Note that the number of wraps on the center spiral also changes (one, two, and
three wraps), but they don't have to be made this way.
All three sizes could have been made with a single central wrap, which would
have made them more compact.
The upper chain shows the top side and the lower one shows the underside so you
can see how it is put together.
The small extra link in the center is made from 16 gauge wire as a size
comparison.
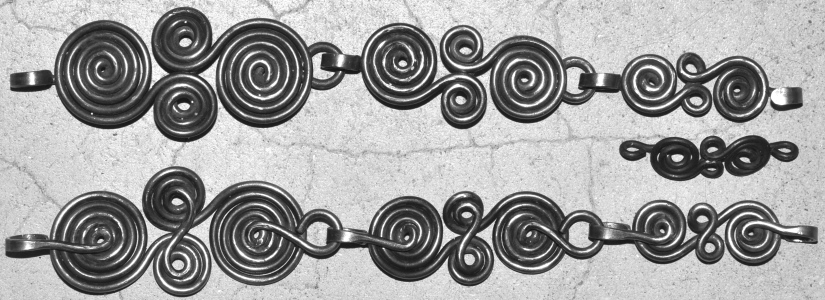
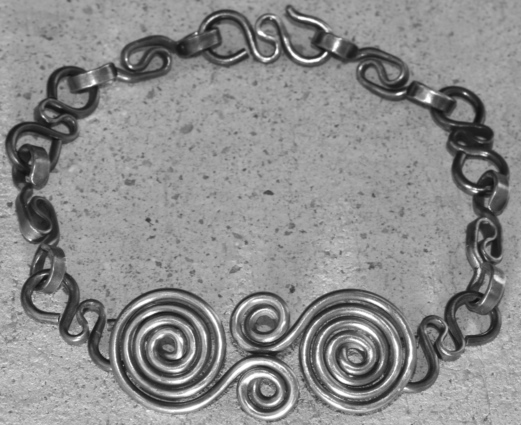
LINK BRACELET in 14 gauge wire uses two types of figure-eight links to set off the
double spiral; the
small links have the center portion flattened before curling.
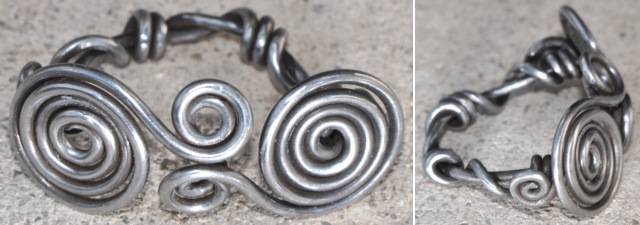
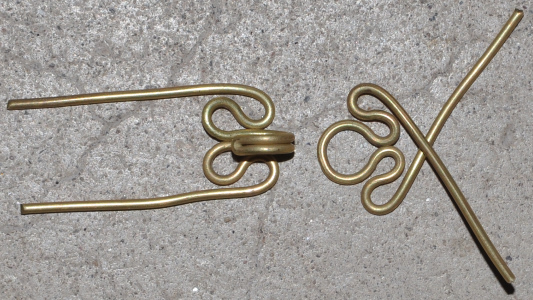
MAGICIAN'S DOUBLE LEMNISCATE RING was made from a single piece of 16-gauge steel wire.
The wires were curved around a piece of tubing and crossed opposite the
center of the spiral, then wrapped around each other, cut to the desired length,
and finished with a small coil at each side.
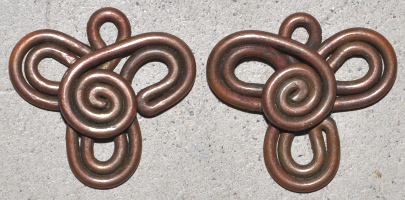
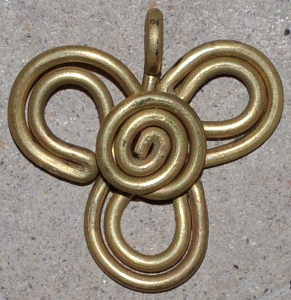
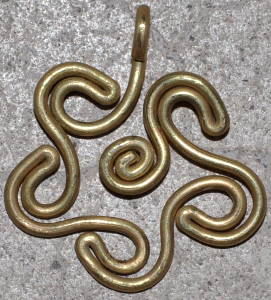
2. Triskele and Pinwheel Flower: Spirals with Three or Five Hooks
These were designed as earrings but could be added to other jewelry.
Earrings should be mirror images (the spirals coil in opposite directions, not
both the same way).
Shown below: threefold (triskele) earrings in 14 gauge recycled copper,
single triskele in 16 gauge brass, fivefold spiral in 16 gauge brass.
The threefold version
is the easiest to make and should be tried before attempting the fivefold
pattern.
1. Cut a piece of wire about 30 cm long and make a tight U-shaped bend
about 6 cm from one end.
2. Use the round nosed pliers to coil the bend into a flat loop.
3. Take the wire on the inside of the loop, measure about 2 cm from the
end of the loop, and make another tight U-shaped bend.
4. Form the second U-shaped bend into another flat loop identical to the first one. Measure another 2 cm of wire and repeat.
5. Note that you have two wire "tails" trailing from the finished triskele.
One runs from the outside of a loop, and the other runs in the
opposite direction from the inside of a loop.
One of these will become the central spiral and the other will become the
pendant bail or the loop for attaching a bead and/or earwire. You can
choose which is which.
On the finished examples above, the copper triskeles use the outside wire for
the central spiral, which coils in the opposite direction from the loops.
The brass triskele uses the inside wire for the central spiral, and it coils in
the same direction as the loops.
The fivefold pinwheel uses the outside wire in a spiral that coils in the same
direction as the loops.
6. The fivefold pinwheel design is made the same way as
the triskele, but only about half as much wire (about 1 cm) is measured off for
each loop.
This is a tighter design which will probably need minor adjustments to even out
the loops once it's finished.
3. Fancy Hook and Eye Clasps
These are made in pairs and can take the place of buttons on clothing or bags. They can also be
used as clasps for chain bracelets.
Shown below: a clasp in 16 gauge brass wire, showing the hook (left), the
eye (right).
Copper and brass are recommended for use on clothing. Black steel wire can rust when the fabric gets wet.
Clasps can be worked in three gauges of wire:
14 gauge: Coats, vests, belts, canvas and leather items.
16 gauge: Shirts, sleeves, dresses.
18 gauge: Undergarments, doll clothing, small pouches, etc.
1. Cut two pieces of wire about 30 cm long. On the first one,
form a U-shaped bend in the center and coil it into a loop (not flat as in the
previous project, but hook-shaped).
On the second wire, form a flat loop in the center.
2. Form two tight S-curved flat loops on each wire as shown. These
have a dual purpose: they keep the clasp flat, and they provide four
attachment points for stitching it on securely.
3. Clip the ends of the wire to your desired length for forming the
spirals. If you want all the spirals to be the same size, all wires must
be the same length, as in the example above.
4. Form the spirals. The hook and eye portions may need a bit of
shaping to fit your specific project; check this before stitching them on.
My embroidered shirt made with 16 gauge brass clasps:
http://www.flickr.com/photos/leonfangs/6761124753/
My embroidered vest made with 14 gauge copper clasps:
http://www.flickr.com/photos/leonfangs/6436812007/
IRONWING TUTORIALS by Lorena Babcock Moore
These free online tutorials are presented for entertainment, inspiration, and personal
instruction. All photos and instructions were created by Lorena Babcock Moore.
The photos and instructions are free of copyright, but
credit and a link are
polite, professional, and appreciated.
Content is not intended for commercial use such as publications, classes that
charge a fee, or other for-profit enterprises.
The metalwork designs are not copyrighted. They are
classic
designs found in several cultures and time periods.
Users are responsible for their own safety, tools and materials,
working environment and conditions, and outcome of finished projects.
For best results, read the instructions carefully several times before starting
a project.
I do not claim that my methods are "correct" or that my
designs are "authentic" for a particular culture or time period.
The projects
are not intended for children. I do not teach classes and am not available for
online instruction or advice.